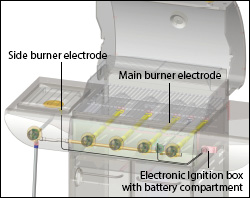
If you are having difficulty with your BBQ's Electronic Ignition a quick visual inspection of the following will help to identify the cause:
Check to ensure that all Electrode(s) spark when the igniter button is pressed.
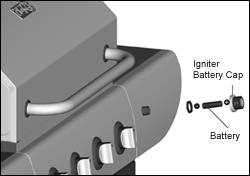
Replace battery. Ensure battery is installed correctly
Check battery igniter cap for proper threading
Check for un-plugged electrode wires or ground wire.
Check wires for damage including tears or breaks
Check electrode for cracks in the porcelain insulator
Check for damage to Electronic Igniter Box.
When the ignition button is pressed, a rapid clicking sound accompanied by a spark should be visible at all electrodes. If a spark is not visible, check the electrode connection to the Electronic ignition box.
Replace the battery. Open the Lid. Press Ignition button and listen for rapid clicks.
If a "spark" is not visible at the electrode and burner connection:
Locate the Electronic Ignition box on the back of the control panel. Check all wire connections.
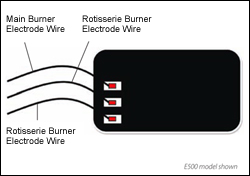
Disconnect the corresponding electrode wire and reconnect by pushing the wire in tightly at the connection point.
If the electrode still does not spark, but a spark and sound can be heard at the other Ignition points, replace the faulty electrode wire.
Note: All main burner, side burner and rotisserie burner connection points are the same.
PROBLEM
IDENTIFYING THE CAUSE:
Burners will not light (with igniter or match)
Positive connection has not been made between the tank and the regulator.
Flow limiting device has been activated. See Resetting Flow Limiting Device below.
Burners are not properly seated over valve orifices
Low or out of propane
Gas supply valve is turned off
PROBLEM
IDENTIFYING THE CAUSE:
Burners will not light with the igniter (No spark)
Ignition battery is dead or corroded
Loose Electrode Wires
Broken electrode – ceramic casing around electrode damaged
Faulty Electronic Ignition box
PROBLEM
IDENTIFYING THE CAUSE:
Fire at control knob and control panel = Flash Back Fire
Blockage inside of burner
Burner is improperly seated over gas jet
PROBLEM
IDENTIFYING THE CAUSE:
Yellow smokey flames/ gas odour can be smelled
Blockage inside of burner
PROBLEM
IDENTIFYING THE CAUSE:
Flame blows out on LOW
High Wind condition – Adjust BBQ to shield from wind
Flow limiting device has been activated. See Resetting Flow Limiting Device below.
Low or out of propane
Burner improperly seated on gas jet
NATURAL GAS MODELS: Installation issues related to incorrect size supply line installed and/or water column supply is not adequate for a barbecue BTU rating of this grill. Do not use a longer natural gas hose than is supplied with your grill.
PROBLEM
IDENTIFYING THE CAUSE:
Low heat generated with knob in "Hi" position
Make certain the problem is isolated to only one burner. If it appears so, the burner and/or burner tubes are blocked
Flow limiting device has been activated. See Resetting Flow Limiting Device below.
Check for a bent or kinked fuel hose
Pre-heat with the lid closed for 15 minutes. In colder temperatures preheat for longer periods.
PROBLEM
IDENTIFYING THE CAUSE:
Low Heat/ Natural Gas Models
Not using the Natural Gas Hose supplied with this BBQ
Gas pressure is affected by the length and piping size of the gas line from the home. Follow the recommendations in the chart below. See natural gas hook-ups and warnings.
From Home to BBQ
Up to 25'
3/8" diameter
26-50'
1/2" diameter
51-100'
2/3" of run 3/4" or 1/3" of run 1/2"
PROBLEM
IDENTIFYING THE CAUSE:
Low or incomplete flame (assuming burners and Venturi tubes are free and clear of blockages)
Flow limiting device has been activated. See Resetting Flow Limiting Device below.
NATURAL GAS MODELS: Installation issues related to incorrect size supply line installed and/or water column supply is not adequate for a barbecue BTU rating of this grill. Do not use a longer natural gas hose than is supplied with your grill.
PROBLEM
IDENTIFYING THE CAUSE:
Too much heat / Excessive flare up
Cooking on the "Hi" setting, without adjusting temperature control
Grease build-up around burner system causing overheating
Grease collection plate and grease cup need to be cleaned
Hood open when grilling
PROBLEM
IDENTIFYING THE CAUSE:
Inside of lid is peeling – like paint peeling
The interior lid is Aluminum not painted. Baked on grease build-up has turned to carbon and is flaking off. Clean thoroughly.
PROBLEM
IDENTIFYING THE CAUSE:
Decreasing heat, "popping sound"
Out of Propane
Burner and/or burner tubes are blocked
PROBLEM
IDENTIFYING THE CAUSE:
Humming noise from Regulator
Cylinder valve opened too quickly
PROBLEM
IDENTIFYING THE CAUSE:
Melting gas supply hose
Your BBQ's Gas supply hose and regulator contains a thermal element that will shut off the flow of gas between 240°F and 300°F, by melting the supply hose and essentially disconnecting from the LP cylinder.
Poor ventilation caused by in-appropiate clearance at the sides and rear of the BBQ.
Overheating caused by high cooking temperatures and grease build-up.
With all control knobs and the gas source in the "OFF" position, Open the BBQ lid
Disconnect the hose and regulator from the Propane tank
Turn all BBQ control knobs to the "HI" position
Let stand for 1-3 minutes, allowing all excess gas in valves and manifold to dissipate
Turn all BBQ control knobs back to the "OFF" position
With the BBQ lid still OPEN, reconnect the hose and regulator to the propane tank- Do not cross thread the connection. Hand-tighten only.
Check all hose connections to ensure that a positive seal has been made.
Slowly turn ON the propane gas supply, ¼ to ½ a turn.
Wait approximately 5 seconds for the hose and regulator pressure to stabilize before lighting (to prevent the flow limiting device feature from being re-activated).
Open the lid of your BBQ
Ensure that the control knobs are in the OFF/CLOSED position
Ensure that the Natural Gas Supply valve is in the OFF/CLOSED position at the Home Connection
Disconnect the Natural Gas Supply hose by separating the Quick Connect Assembly at the Home connection
Turn all control knobs to the ON/OPEN position (MAX)
Reconnect the Natural Gas Supply hose by securing the Quick Connect assembly connection
Using your hands only, check all connections to confirm that positive seal has been
Turn the knobs to the OFF/CLOSED position
Slowly turn ON the Natural Gas Supply valve to the ON/OPEN position
Wait 30 seconds for the gas pressure to stabilize (60 seconds in cold weather)
Turn ON/OPEN the selected burner control knob, to the MAX position and wait 3 to 5 seconds
Press the Electronic ignition button, or use the match and match holder to ignite the selected burner (BBQ lighter)
Repeat steps if not successful on first try
Pellet Grill
IDENTIFYING THE CAUSE:
SOLUTION:
Power supply
Check that the power cord is plugged in.
Verify there is power at the electrical outlet.
The GFCI outlet may need to be reset. Initiate start-up, if no ignition, check the controller.
Controller setting
Turn controller "OFF" with lid open, turn the controller to "SMOKE". Check that the screen lights up, and displays actual temperature.
Fuse may be blown
Turn controller "OFF", and unplug power cord.
Unscrew the controller and pull forward to check the fuse. If darkened, the fuse has blown and needs to be replaced.
If the fuse is fine, reassemble the controller.
Igniter
With the controller "OFF", lid open and barbecue cool, remove cooking grates and baffle plate to expose the burner pot and igniter. Turn the controller to "SMOKE", and visually inspect the igniter.
If the igniter does turn NOT turn red, too much ash or pellets are in the burner pot. Clean the igniter or check the igniter connector for damages or if it has become loose.
If the igniter is not working, and a replacement part is required, see the Manual Lighting Instructions.
Auger motor
With the controller "OFF", lid open and barbecue cool, remove cooking grates and baffle plate to expose the burner pot. Turn the controller to "SMOKE", and visually check to ensure the auger turning and feeding pellets.
If not turning, turn the controller "OFF", remove pellets from hopper and check for a blockage in the auger. You may need to remove the auger box housing to check properly.
Control board
If not working, please call the Customer Care hotline at 1-855-453-2150.
IDENTIFYING THE CAUSE:
SOLUTION:
Insufficient air flow through burner pot
Check the burn pot for ash buildup or obstructions.
Check the fan for proper operation, that the air intake is not blocked and that there is no blockage in the auger bushing.
Perform a quick test. Remove cooking grates and baffle plate. With the lid open, set the controller to "SMOKE", and wait 10 minutes. Check that the flame produced is bright, vibrant and is being blown into the barbecue by the fan.
Lid open
Always cook with the lid closed. Not only does this keep the temperature even, your food will cook faster, using less fuel.
Insufficient or poor fuel
Check the hopper for sufficient fuel.
Check fuel for dampness and sawdust.
Check and clean the temperature probe.
Controller "P" setting
Ensure "P" setting is correct. Depending on ambient temperatures you may need to adjust the setting. See the Operation and Performance section of your Safety and Care manual for guidance.
IDENTIFYING THE CAUSE:
SOLUTION:
"P" Setting is too LOW.
There may have been too many left over pellets in the burner pot at start-up.
Verify that the controller is on the "SMOKE" setting. With a paper clip in hand gently push the "P" Reset button to increase to the next "P" setting. See the Operation and Performance section of your Safety and Care manual for more information.
IDENTIFYING THE CAUSE:
SOLUTION:
Barbecue requires maintenance
Check and clean interior parts as outlined in the Cleaning and Maintenance section of your Safety and Care manual.
During shut-down, turn the unit to "MAX" to perform a burn off of excess grease.
Old or damp wood pellets. Incorrect pellets (You may be using heating pellets instead of grilling pellets)
Check and clear the hopper and burner pot for old or damp pellets, replacing them with fresh dry pellets.
Too much ash in the burner pot.
When the unit is cooled, Wet/Dry Vac the burner pot and interior of the grill.
IDENTIFYING THE CAUSE:
SOLUTION:
Barbecue maintenance required.
Cooking temperatures are too high.
Clean the interior of the barbecue including the baffle plate, grease trough and interior surfaces to remove grease buildup.
Try cooking at lower temperatures for longer periods.
Grease does have a flash point, keep the temperature under 350° F (177° C) when cooking highly greasy food.
IDENTIFYING THE CAUSE:
SOLUTION:
Power cord is not properly plugged in.
Check that the controller is in the "OFF", and ensure the power cord is plugged in correctly.
Ensure barbecue is plugged into a working GFCI outlet
The GFCI outlet has been tripped
Ensure GFCI is minimum 15-amp service.
Ensure you are NOT using over a 25’ (7.6 m) extension cord.
Reset GFCI outlet. If it happens again, try another outlet.
The circuit board fuse has been tripped.
Ensure all wire connections are firmly connected and dry.
Fuse (5-amp.) must be manually replaced
IDENTIFYING THE CAUSE:
SOLUTION:
The grill has overheated, due to either a grease fire, over-firing caused by excess fuel, or too high ambient temperatures and direct sunlight.
Turn the controller "OFF" and unplug the power cord. Allow the grill to cool. Perform all cleaning and maintenance of interior parts, including cooking grates, baffle plate, grease trough and burner pot, as outlined in the Safety and Care manual.
Plug in power cord. Open lid. Turn controller to "SMOKE". Wait until the unit is creating smoke (3-5 min) before setting the desired temperature and closing the lid.
Place unit in shaded area.
Open lid to reduce internal temperature.
Temperature probe wire not making connection.
Ensure probe wire is connected correctly to control.
Confirm wire connections and check for any damage.
IDENTIFYING THE CAUSE:
SOLUTION:
Controller was not in the "OFF" position when the power cord was plugged in.
Turn controller to "OFF". Open the lid. Wait 2 minutes, before setting the controller to "SMOKE". Wait until the unit is creating smoke (3-5 min) before setting the desired temperature and closing the lid
This safety feature prevents an accidental start.
IDENTIFYING THE CAUSE:
SOLUTION:
Is an alert that the temperature is below 150° F (65° C).
This is a warning that at low temperatures the fire could go out. a) Check the hopper for sufficient fuel or blockage. b) Check burner pot for ash buildup or obstructions. CAUTION: Only check burner pot when cool. c) Check fan to confirm operation. d) Check auger motor to confirm operation
IDENTIFYING THE CAUSE:
SOLUTION:
The Igniter is "ON"
This indicates that the igniter is in use.
Pizza Gas Oven
POSSIBLE CAUSE:
PREVENTION / SOLUTION:
Low or out of propane
Check propane level. Refill tank if low or out of propane.
Regulator flow limiting device (FLD) activated due to a poor connection, improper lighting
Check all connections. Follow the regulator reset instructions on page 13, and perform a leak test–see instructions on page 14.
Flame safety device (FSD) has been activated
Follow regulator reset instructions on page 13 to restart the system.
Electrode failure
Replace electrode or follow the match lighting procedure.
Burner not properly seated on valve assembly
Re-engage burner and valve.
POSSIBLE CAUSE:
PREVENTION / SOLUTION:
Low or out of propane
Check propane level. Refill tank if low or out of propane.
Regulator flow limiting device (FLD) activated due to improper lighting procedure or a gas leak
Shut down and perform a leak test–see instructions on page 14. Perform a regulator reset before attempting to relight–see instructions on page 13.
POSSIBLE CAUSE:
PREVENTION / SOLUTION:
Improper lighting procedure. The control knob was not held down long enough during lighting.
Turn the control knob OFF/"O" and follow proper lighting procedure. When lighting, you must push in and turn the control knob very slowly from OFF/"O" to the "MAX" position, and keep the knob pressed in for at least 5 seconds after ignition. This can take a few attempts.
Flame safety device (FSD) activated. The FSD is a part of the gas valve that ensures that the fuel supply to the pizza oven is cut off automatically and immediately if for any reason the flame goes out or becomes unstable.
Follow the regulator reset instructions on page 13, and perform a leak test–instructions on page 14.
Regulator flow limiting device (FLD) activated due to improper lighting procedure, a poor connection or a leak
Check all connections. Follow the regulator reset Instructions on page 13, and perform a leak test– see instructions on page 14.
Low or out of propane
Check propane level. Refill tank if low or out of propane.
High or gusting winds
Relocate the pizza oven to a less windy location. For outdoor use only.
POSSIBLE CAUSE:
PREVENTION / SOLUTION:
Low or out of propane
Check propane level. Refill tank if low or out of propane.
Longer preheat required
Preheat for 20 minutes. In colder climates more time may be required.
Regulator flow limiting device (FLD) activated due to improper lighting procedure, a poor connection or a leak
Check all connections. Follow the regulator reset Instructions on page 13, and perform a leak test– see instructions on page 14.
POSSIBLE CAUSE:
PREVENTION / SOLUTION:
When pizza toppings and/or sauce fall onto the pizza stone or come in contact with the rear heat shield, a flare-up can occur
Avoid allowing sauce and pizza toppings to fall onto the pizza stone and avoid launching your pizza too far back on the pizza stone. If a flare up occurs, simply use your pizza peel to remove the pizza and wait for it to burn off. When the oven is OFF/"0" and has cooled, follow the cleaning instructions on page 28.
Oven temperature too hot
Following preheat on "MAX", adjust pizza oven temperature lower if required.
Excess flour on the cooking surface
When the pizza stone has cooled, brush away any excess flour from the cooking surface and adjust the amount of flour being used on your pizza peel.
POSSIBLE CAUSE:
PREVENTION / SOLUTION:
Burner venturi tube has a spider web or other blockage that is stopping the flow of gas into the burner
Turn gas control knob OFF/ "0". Close the LP cylinder and disconnect regulator. Clean the burner venturi tubes.
POSSIBLE CAUSE:
PREVENTION / SOLUTION:
The pizza stone will bake on and burn excess flour, sauces and toppings that fall onto the surface and become burnt, darkening the pizza stone
The pizza stone will change colour, but this will not affect performance. Baked on food, ash and debris can be brushed off with a a long-handled scraper or brush when the oven is not in use, cool and "OFF". For a more thorough cleaning, when the oven is not in use, cool and "OFF", remove and turn over the pizza stone and reposition. Preheating the pizza oven on high will allow all debris to be burned off.
POSSIBLE CAUSE:
PREVENTION / SOLUTION:
The gas burner has not lit correctly
Turn the control knob to the OFF/ "0" position. Wait 5 minutes before relighting. Always follow the proper lighting procedure to avoid potential safety risks.
Portable Grill
PROBLEM
SOLUTIONS
Burners will not light (with igniter or match)
Positive connection has not been made between the LP cylinder, regulator and oven.
Low or out of propane.
Gas supply valve is turned off.
Burners are not properly seated over valve orifices.
The portable grill gas regulator includes a flow limiting feature for consumer safety. This feature measures the amount of propane going through the regulator to ensure the levels are safe. If the flow rate through the regulator is too high (i.e., a symptom of a large leak, or improper lighting sequence), the flow limiting feature will be triggered, restricting the flow of propane. This safety system can accidentally be activated by turning on the control knob too quickly or leaving the control knob or gas supply valve in the ON position, before connecting a tank.
PROBLEM
SOLUTIONS
Burners will not light with the igniter (no spark)
Electrode wire unplugged from the piezo ignition.
Faulty piezo ignition.
PROBLEM
SOLUTIONS
Melting control knob/fire at control knob and control panel
Burner venturi tube has a blockage.
Burner is improperly seated over gas jet.
PROBLEM
SOLUTIONS
Fire at any connection
Gas is leaking from a faulty connection. Tighten connections or replaced damaged parts. Perform a leak test on all connections before cooking on the grill again.
PROBLEM
SOLUTIONS
Grill too hot
Excessive flare-up. Maintenance required.
Adjust temperature control knob to lower temperatures.
Build-up of grease in the firebox. Maintenance required.
Regulator reset required or a replacement required.
PROBLEM
SOLUTIONS
Yellow smoky flames/gas odour can be smelled
Burner and/or burner tubes have a blockage.
PROBLEM
SOLUTIONS
Flame blows out on low
Flow limiting device in regulator has been activated either due to a leak, poor connection, or improper lighting sequence.
Low or out of propane.
High Wind. Adjust grill to shield from wind.
Burner is improperly seated on gas jet.
PROBLEM
SOLUTIONS
Low Heat
Flow limiting device in regulator has been activated due to a leak, poor connection, or improper lighting sequence. Perform a leak test page 20. Perform a regulator reset page 19.
Check for a bent or kinked fuel hose.
In colder temperatures, preheat for longer periods.
PROBLEM
SOLUTIONS
Too much heat/excessive flare up
Grease builds up around burner system causing dangerous flare ups and over-heating.
Cooking on the “MAX” setting, without adjusting temperature control.
Grease collection plate and grease cup need to be cleaned.
Covering more than 70% of the cooking surface may cause the grill to overheat.
Excessive fat on meat and cooking on high temperatures.
PROBLEM
SOLUTIONS
Inside of lid is peeling—like paint peeling
The interior lid is aluminum not painted. Baked on grease build-up has turned to carbon and is flaking off. Clean thoroughly.
PROBLEM
SOLUTIONS
Decreasing heat, "popping sound"
Out of propane.
Burner and/or burner tubes are blocked.
PROBLEM
SOLUTIONS
Humming noise from regulator
Cylinder valve opened too quickly.
PROBLEM
SOLUTIONS
Melting gas supply hose
Your grill's gas supply hose and regulator contain a thermal element that will shut off the flow of gas between 240°F and 300°F, by melting the supply hose and essentially disconnecting from the LP cylinder.
Poor ventilation caused by inappropriate clearance at the sides and rear of the grill.
Overheating caused by high cooking temperatures and grease build-up.
Build up of grease in quick-clean grease cup and tray.