|
If you are having difficulty with your BBQ's Electronic Ignition a quick visual inspection of the following will help to identify the cause:
|
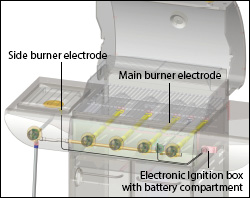
When the ignition button is pressed, a rapid clicking sound accompanied by a spark should be visible at all electrodes. If a spark is not visible, check the electrode connection to the Electronic ignition box. |
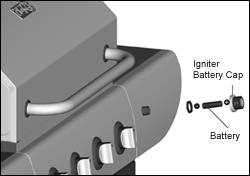
Replace the battery. Open the Lid. Press Ignition button and listen |
If a "spark" is not visible at the electrode and burner connection:
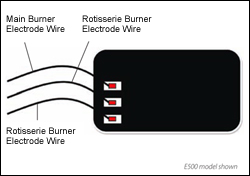
Note: All main burner, side burner and rotisserie burner connection points are the same. |
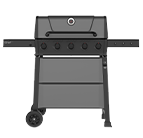
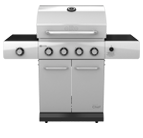
- All Models
- Discover
Discover Series Grills
-

85-0204
-

85-0205
-


85-0206
-
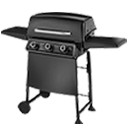
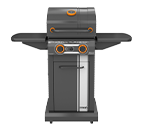
- Prime
Prime Series Grills
-

85-3001
-

85-3135
-
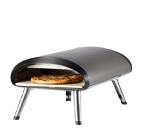
- Pizza Oven & Charcoal
Pizza Ovens & Charcoal Grills
-

85-0110
-


85-0258-6
-
- Elite
Elite Series Grills
-

85-3138
-
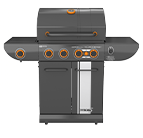
- Grill Turismo
Grill Turismo Series Grills
-

85-0044
-

85-3137
-

85-0107
-

85-0106
-


85-0109
-

85-3185
-


85-0259
-
- Accessories & Parts
- Shop for Parts
Support
Everything you need to know
Barbecue
- Troubleshooting
- Grilling Tips
- BBQ Safety
- BBQ Maintenance
Pellet Grill
- Troubleshooting
- How-To's
- Grilling Tips
- Pellet Grill Maintenance
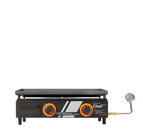
Griddle
- Grilling Tips
- Griddle Maintenance
Pizza Gas Oven
- Troubleshooting
- Tips
- Maintenance
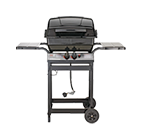
Portable Grill
- Troubleshooting
- Grilling Tips
- Maintenance
Barbecue Troubleshooting
 Resolving IGNITER Performance Issues
Burners will not light (with igniter or match)
| PROBLEM | IDENTIFYING THE CAUSE: |
| Burners will not light (with igniter or match) |
|
Burners will not light with the igniter (No spark)
| PROBLEM | IDENTIFYING THE CAUSE: |
| Burners will not light with the igniter (No spark) |
|
Fire at control knob and control panel = Flash Back Fire
| PROBLEM | IDENTIFYING THE CAUSE: |
| Fire at control knob and control panel = Flash Back Fire |
|
Yellow smokey flames / gas odour can be smelled
| PROBLEM | IDENTIFYING THE CAUSE: |
| Yellow smokey flames/ gas odour can be smelled |
|
Flame blows out on LOW
| PROBLEM | IDENTIFYING THE CAUSE: |
| Flame blows out on LOW |
|
Low heat generated with knob in "Hi" position
| PROBLEM | IDENTIFYING THE CAUSE: |
| Low heat generated with knob in "Hi" position |
|
Low Heat/ Natural Gas Models
| PROBLEM | IDENTIFYING THE CAUSE: | ||||||||
| Low Heat/ Natural Gas Models |
|
||||||||
Low or incomplete flame (assuming burners and Venturi tubes are free and clear of blockages)
| PROBLEM | IDENTIFYING THE CAUSE: |
| Low or incomplete flame (assuming burners and Venturi tubes are free and clear of blockages) |
|
Too much heat / Excessive flare up
| PROBLEM | IDENTIFYING THE CAUSE: |
| Too much heat / Excessive flare up |
|
Inside of lid is peeling – like paint peeling
| PROBLEM | IDENTIFYING THE CAUSE: |
| Inside of lid is peeling – like paint peeling |
|
Decreasing heat, "popping sound"
| PROBLEM | IDENTIFYING THE CAUSE: |
| Decreasing heat, "popping sound" |
|
Humming noise from Regulator
| PROBLEM | IDENTIFYING THE CAUSE: |
| Humming noise from Regulator |
|
Melting gas supply hose
| PROBLEM | IDENTIFYING THE CAUSE: |
| Melting gas supply hose |
|
Resetting Flow Limiting Device – Propane
- With all control knobs and the gas source in the "OFF" position, Open the BBQ lid
- Disconnect the hose and regulator from the Propane tank
- Turn all BBQ control knobs to the "HI" position
- Let stand for 1-3 minutes, allowing all excess gas in valves and manifold to dissipate
- Turn all BBQ control knobs back to the "OFF" position
- With the BBQ lid still OPEN, reconnect the hose and regulator to the propane tank- Do not cross thread the connection. Hand-tighten only.
- Check all hose connections to ensure that a positive seal has been made.
- Slowly turn ON the propane gas supply, ¼ to ½ a turn.
- Wait approximately 5 seconds for the hose and regulator pressure to stabilize before lighting (to prevent the flow limiting device feature from being re-activated).
Resetting Flow Limiting Device – Natural Gas
- Open the lid of your BBQ
- Ensure that the control knobs are in the OFF/CLOSED position
- Ensure that the Natural Gas Supply valve is in the OFF/CLOSED position at the Home Connection
- Disconnect the Natural Gas Supply hose by separating the Quick Connect Assembly at the Home connection
- Turn all control knobs to the ON/OPEN position (MAX)
- Reconnect the Natural Gas Supply hose by securing the Quick Connect assembly connection
- Using your hands only, check all connections to confirm that positive seal has been
- Turn the knobs to the OFF/CLOSED position
- Slowly turn ON the Natural Gas Supply valve to the ON/OPEN position
- Wait 30 seconds for the gas pressure to stabilize (60 seconds in cold weather)
- Turn ON/OPEN the selected burner control knob, to the MAX position and wait 3 to 5 seconds
- Press the Electronic ignition button, or use the match and match holder to ignite the selected burner (BBQ lighter)
- Repeat steps if not successful on first try
Pellet Grill Troubleshooting
Grill will NOT start
| IDENTIFYING THE CAUSE: | SOLUTION: |
| Power supply |
|
| Controller setting |
|
| Fuse may be blown |
|
| Igniter |
|
| Auger motor |
|
| Control board |
|
Difficulty getting to set temperature or unstable temperatures.
| IDENTIFYING THE CAUSE: | SOLUTION: |
| Insufficient air flow through burner pot |
|
| Lid open |
|
| Insufficient or poor fuel |
|
| Controller "P" setting |
|
Grill Temperature on "SMOKE" setting is too high.
| IDENTIFYING THE CAUSE: | SOLUTION: |
|
|
Grill produces excess smoke or dark smoke.
| IDENTIFYING THE CAUSE: | SOLUTION: |
| Barbecue requires maintenance |
|
| Old or damp wood pellets. Incorrect pellets (You may be using heating pellets instead of grilling pellets) |
|
| Too much ash in the burner pot. |
|
Frequent Flare - ups
| IDENTIFYING THE CAUSE: | SOLUTION: |
|
|
LCD Screen Will Not Light Up
| IDENTIFYING THE CAUSE: | SOLUTION: |
| Power cord is not properly plugged in. |
|
| The GFCI outlet has been tripped |
|
| The circuit board fuse has been tripped. |
|
"Erh" Error Message
| IDENTIFYING THE CAUSE: | SOLUTION: |
| The grill has overheated, due to either a grease fire, over-firing caused by excess fuel, or too high ambient temperatures and direct sunlight. |
|
| Temperature probe wire not making connection. |
|
"ErP" Error Message
| IDENTIFYING THE CAUSE: | SOLUTION: |
| Controller was not in the "OFF" position when the power cord was plugged in. |
|
Flashing Temperature
| IDENTIFYING THE CAUSE: | SOLUTION: |
| Is an alert that the temperature is below 150° F (65° C). |
|
Flashing Dots
| IDENTIFYING THE CAUSE: | SOLUTION: |
| The Igniter is "ON" |
|
Barbecue Grilling Tips
WARNING
Always observe safe food handling and safe food preparation practices when using this Barbecue, to prevent food-borne illnesses.
Avoiding Cross Contamination
Sanitize counters, equipment and utensils after handling raw meat, seafood or poultry. Rinse with a dilute chlorine bleach solution, one teaspoon to a quart of water. Avoid cross-contamination in preparing food.
- Always cook foods adequately. Undercooked foods can retain bacteria, especially if thawed or exposed to warm conditions prior to cooking
- Always use a meat thermometer to confirm that foods have been fully cooked.
- Always use separate plates and utensils for the handling of raw food. Never place raw food and cooked food on the same plate, and never place cooked food on a plate that was used for handling raw food. Always carefully wash all plates and utensils used to handle raw food before using them to handle cooked food.
- Always wash all vegetables, seafood and poultry before cooking.
- Always leave uncooked foods in the refrigerator until you are ready to start cooking
- Always marinate meat in the refrigerator. Always dispose of the excess marinade, and never reuse it.
- Always preheat your Barbecue for 5 to 10 minutes before cooking, and clean all grease and food residue before using the cooking grates.
Grilling Tips
A few helpful hints will ensure that your grilling results are perfect every time!
- Apply a light coating of cooking oil or vegetable shortening to your cooking grates before grilling, to prevent foods from sticking
- Always preheat the appliance on HIGH before adding food.
- Cook similar portion sizes together, so that they all cook evenly
- To reduce flare up's cook lean cuts of meat, trim excess fat and avoid cooking over very high temperatures.
- Always ensure that the temperature is adjusted following preheat. HIGH is intended for fast pre-heating of the appliance, searing steaks and other cuts of meat.
- Medium heat is intended for most grilling, baking and roasting
- Low heat is intended for warming, slow cooking, smoking or cooking delicate foods
- Never pierce foods while they are cooking on the Barbecue, as this will dry them out
- Turn foods infrequently. Turn food only once, halfway through cooking time.
- Do not place frozen meats on the cooking grates as this will permanently damage the cooking surface.
- Always cook with lid down to preserve BARBECUE temperature.
- Trim excess fat from meats and slit the remaining fat at two-inch increments to avoid flare-ups and curling. Fatty meats may be cooked indirectly on lower heat settings.
- Apply salt only after cooking to prevent drying out the meat.
- Baste meat with barbecue sauce or other sugar-based sauces only during the last few minutes of cooking to prevent burning.
Barbecue Cooking Methods
Direct Cooking — This is the most popular cooking method and involves cooking food directly over the flame, such as searing a steak.
Indirect Cooking — Food is placed on the cooking grates, offset from the heat source. With the barbecue lid closed reflected heat surrounds the food cooking it more evenly and gently. This method is perfect for roasts, but is also useful whenever you want to slow cook or bake a wide variety of foods. The barbecue lid should always be closed when using the indirect cooking method.
Barbecue Control Settings
HI — Use to pre-heat barbecue and for quick searing of meats and vegetables.
MED — Barbecue steaks, pork chops and hamburgers. You may also sear meats on medium and cook them on low.
LOW — Used for cooking dense vegetables, roasts, thick cut of meat, poultry and fish.
General Side Burner Tips
- For best results preheat your side burner for 10-15 minutes on "HI"
- When boiling water or warming foods always ensure that you are using a covered pot or wok
- Ensure that your gas barbecue is positioned away from high winds or cold air as this will adversely affect your side burner preheating and cooking performance
- Your side burner will take longer to preheat and cook than your indoor range.
- Remove all food residue and dirt on side burner surface.
- Inspect and clean your side burner orifice periodically and confirm that it is clear of food residue, cobwebs or other insect debris that may cause a FLASH BACK FIRE.
Infrared Side Burner
Your Infrared Zone side burner is a powerful Infrared burner that will allow the chef to grill like a professional.
Infrared burners offer the perfect searing power with the most intense heat delivered directly to your foods.
How is this different from your conventional BBQ burners? Unlike conventional burners, Infrared heat is not lost to the surrounding air and will offer more efficient and effective cooking heat.
When not in use as a sear burner, use this space as a traditional side burner by simply adjusting the Infrared Zone control knob to a lower setting that suits your needs. Reverse the Infrared Zone cooking grate for all foods requiring a pot, wok or frying pan.
Remember:
- Adjust your temperature based on the type of foods and cooking heat required
- Remove and clean the Infrared Zone's grease collection tray to avoid spilling grease on your deck or patio and to avoid a potential grease fire.
Stainless Steel Rotisserie Burner
This 8,500 BTU/hr Stainless Steel Rear Rotisserie Burner is the perfect tool for cooking chicken wings, ribs, lamb leg, and small roasts.
Remember:
- Cook foods that have been thawed at room temperature ONLY
- Cook over indirect heat with plenty of moisture. Use a drip pan big enough to fit under the entire rotating entree. Keep basting fluid in the drip pan at all times.
- Never allow a rotisserie drip pan to dry out while cooking. Grease dripping into a hot drip pan can easily ignite and damage the pan while ruining your meal.
- Cook with the lid closed to maintain proper cooking temperatures
- ONLY for the Stainless Steel Rotisserie Burner - Use the far left and right burners in conjunction with the Rear Rotisserie Burner for more convection style, indirect cooking, and to maintain cooking temperatures
- Always use a meat temperature probe to ensure proper internal meat temperatures and doneness.
Rotisserie Kit Sold Separately.
Pellet Grill Grilling Tips
WARNING
Always observe safe food handling and safe food preparation practices when using this Barbecue, to prevent food-borne illnesses.
Avoiding Cross Contamination
Sanitize counters, equipment and utensils after handling raw meat, seafood or poultry. Rinse with a dilute chlorine bleach solution, one teaspoon to a quart of water. Avoid cross-contamination in preparing food.
- Always cook foods adequately. Undercooked foods can retain bacteria, especially if thawed or exposed to warm conditions prior to cooking
- Always use a meat thermometer to confirm that foods have been fully cooked.
- Always use separate plates and utensils for the handling of raw food. Never place raw food and cooked food on the same plate, and never place cooked food on a plate that was used for handling raw food. Always carefully wash all plates and utensils used to handle raw food before using them to handle cooked food.
- Always wash all vegetables, seafood and poultry before cooking.
- Always leave uncooked foods in the refrigerator until you are ready to start cooking
- Always marinate meat in the refrigerator. Always dispose of the excess marinade, and never reuse it.
- Always preheat your Barbecue for 5 to 10 minutes before cooking, and clean all grease and food residue before using the cooking grates.
Grilling Tips
A few helpful hints will ensure that your grilling results are perfect every time!
- Apply a light coating of cooking oil or vegetable shortening to your cooking grates before grilling, to prevent foods from sticking
- Always preheat the appliance on HIGH before adding food.
- Cook similar portion sizes together, so that they all cook evenly
- To reduce flare up's cook lean cuts of meat, trim excess fat and avoid cooking over very high temperatures.
- Always ensure that the temperature is adjusted following preheat. HIGH is intended for fast pre-heating of the appliance, searing steaks and other cuts of meat.
- Medium heat is intended for most grilling, baking and roasting
- Low heat is intended for warming, slow cooking, smoking or cooking delicate foods
- Never pierce foods while they are cooking on the Barbecue, as this will dry them out
- Turn foods infrequently. Turn food only once, halfway through cooking time.
- Do not place frozen meats on the cooking grates as this will permanently damage the cooking surface.
- Always cook with lid down to preserve BARBECUE temperature.
- Trim excess fat from meats and slit the remaining fat at two-inch increments to avoid flare-ups and curling. Fatty meats may be cooked indirectly on lower heat settings.
- Apply salt only after cooking to prevent drying out the meat.
- Baste meat with barbecue sauce or other sugar-based sauces only during the last few minutes of cooking to prevent burning.
Pellet Grill Cooking Methods
SMOKE. BAKE. ROAST. BRAISE. GRILL
Smoke = 160-200°F (Smoking fish or a turkey leg)
Medium = 250-300°F (Braising short ribs / Grilling chicken skewers)
High = 400-475°F (Baking desserts, pizza or bread / Roasting prime rib)
Pellet Grill Control Settings
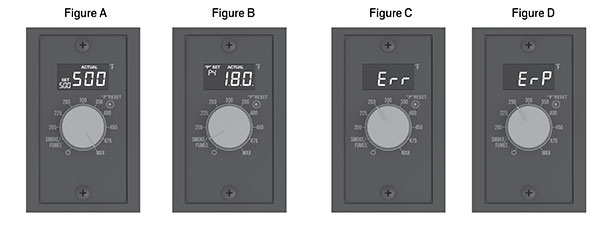
| SMOKE | Start-up mode, "P" reset mode. The barbecue operates at the lowest temperature without extinguishing (Figure B). |
|---|---|
| MAX | Max temperature for temporary searing and burn-off only. |
| SET | Displays desired set temperature (Figure A). |
| ACTUAL | Displays current temperature. |
| "P" SET | Indicates current “P” setting from P0 to P7 (Figure B). |
| 888 | Displayed temporarily when connected to AC power. |
| Flashing Barbecue Temperature | Temperature is below 66˚C /150˚F. |
| Flashing... | Indicates the igniter is on. |
| Erh | Indicates that the barbecue is overheating. |
| Err | Indicates that the temperature probe is not connected (Figure C). |
| ErP | Indicates a power interruption while in operation or controller was not in the "OFF" position when the power supply was connected (Figure D) |
| "P" Reset | Assists in fine tuning temperatures to accommodate for cooking style, quality of pellets, weather conditions and more. |
General Side Burner Tips
- For best results preheat your side burner for 10-15 minutes on "HI"
- When boiling water or warming foods always ensure that you are using a covered pot or wok
- Ensure that your gas barbecue is positioned away from high winds or cold air as this will adversely affect your side burner preheating and cooking performance
- Your side burner will take longer to preheat and cook than your indoor range.
- Remove all food residue and dirt on side burner surface.
- Inspect and clean your side burner orifice periodically and confirm that it is clear of food residue, cobwebs or other insect debris that may cause a FLASH BACK FIRE.
Infrared Side Burner
Your Infrared Zone side burner is a powerful Infrared burner that will allow the chef to grill like a professional.
Infrared burners offer the perfect searing power with the most intense heat delivered directly to your foods.
How is this different from your conventional BBQ burners? Unlike conventional burners, Infrared heat is not lost to the surrounding air and will offer more efficient and effective cooking heat.
When not in use as a sear burner, use this space as a traditional side burner by simply adjusting the Infrared Zone control knob to a lower setting that suits your needs. Reverse the Infrared Zone cooking grate for all foods requiring a pot, wok or frying pan.
Remember:
- Adjust your temperature based on the type of foods and cooking heat required
- Remove and clean the Infrared Zone's grease collection tray to avoid spilling grease on your deck or patio and to avoid a potential grease fire.
Stainless Steel Rotisserie Burner
This 8,500 BTU/hr Stainless Steel Rear Rotisserie Burner is the perfect tool for cooking chicken wings, ribs, lamb leg, and small roasts.
Remember:
- Cook foods that have been thawed at room temperature ONLY
- Cook over indirect heat with plenty of moisture. Use a drip pan big enough to fit under the entire rotating entree. Keep basting fluid in the drip pan at all times.
- Never allow a rotisserie drip pan to dry out while cooking. Grease dripping into a hot drip pan can easily ignite and damage the pan while ruining your meal.
- Cook with the lid closed to maintain proper cooking temperatures
- ONLY for the Stainless Steel Rotisserie Burner - Use the far left and right burners in conjunction with the Rear Rotisserie Burner for more convection style, indirect cooking, and to maintain cooking temperatures
- Always use a meat temperature probe to ensure proper internal meat temperatures and doneness.
Rotisserie Kit Sold Separately.
Barbecue Safety
Leak Test
Perform a Leak Test every time you change your gas tank, when your barbecue has not been used for a period of time, or if you notice a dramatic change in your barbecues performance.
- Turn all grill control knobs to "OFF".
- Ensure that the regulator is tightly connected to LP cylinder.
- Completely open LP cylinder valve by turning hand wheel counterclockwise. If you hear a rushing sound, turn gas off immediately. There is a leak at the connection. Correct before proceeding.
- Brush soapy solution onto hose and regulator and all connections from the LP tank to the main and side burner manifold.
- If "growing" bubbles appear, there is a leak. Close LP cylinder valve immediately and re-tighten connections. If leaks cannot be stopped do not try to repair. Call the Customer Care Hotline for replacement parts.
- Always close LP cylinder valve after performing leak test by turning hand wheel clockwise.
Grease Fires
Characteristics of a Grease Fire:
- A fire burning inside the BBQ burner box- may become uncontrollable if not monitored
- Usually accompanied by high flames, a lot of smoke and black soot
- May cause charring on the interior of BBQ lid, lid side panels (inside and outside), may damage temperature gauge, cause brownish colouring on stainless steel lids and soot and ash build up on cooking grates.
Prevent Grease Fires By:
- Removing grease build-up on key parts such as flame tamers, cooking grates, and burner box.
- Frequently cleaning the grease collection plate and/or grease cup
- Always reducing cooking temperature to "MED" or "LOW" heat, following PREHEAT.
- Burning off build-up on the cooking grates and heat plates after each use
Flash Back Fires
Spiders and insects are attracted to the smell of propane and natural gas, and often build nests inside your BBQ's burners, which is the root cause of a FLASH BACK FIRE. Lighting your burners without first checking and cleaning out the Venturi tubes, burner ports, and the inside of burners can lead to a serious flash back fire resulting in damage to the BBQ, property and/ or personal injury.
Characteristics of a Flash Back Fire:
- Hot or melting control knobs
- Burners may burn with large yellow flames
- Burners may not light
- A fire burning outside of the burner box, usually visible behind or under the control panel
Prevent Flash Back Fires by:
- Remove burners to clean and check for blockages – perform burner safety and maintenance checks
Barbecue Maintenance
Cleaning and maintaining your barbecue ensures your families safety, optimal parts performance, and a long life for your barbecue. Perform at the start of the season, and at least twice in-season, more if the barbecue is being used frequently or year-round.
BBQ Lid and Burner Box Maintenance
The interior of our lids are made of aluminum and are not painted. If you are noticing what looks like black peeling paint, this is a deposit of grease and smoke that collects during normal use. During use, the grease and smoke vapors slowly oxidize into carbon and collect on the inside of your lid. This deposit will eventually peel, and looks very similar to paint. The peeling normally starts in the center of the lid and spreads outward. It may come off in sheets or flakes, and is shiny on one side and dull on the other. These carbon deposits are non-toxic, but must be regularly removed. Fortunately, the peeling is easy to remove:
Three methods for cleaning the interior of the lid and the burner box:
- Simply brush off all loose particles with a brass brush before you start grilling. To prevent future build-up, wipe lid with paper towels or a mild soap-and-water solution after every grilling session. Do this while the grill lid is warm – not hot!
- For heavily soiled lids that require more effort, remove all interior parts, and spray the interior lid and burner box with a BBQ degreaser. Allow the degreaser to penetrate the build-up. This may take approximately 10 minutes. Depending on the build up, you may need to spray the interior a second time and wait. Using a grill brush, crumpled aluminum foil, or a paint scraper- scrub away the build-up. Do not use steel wool or harsh chemical cleaners that may leave a toxic residue on the interior of your BBQ.
- Lay a piece of aluminum foil across the entire cooking surface with the shiny side up. Light the BBQ and preheat on high. Close the lid. Essentially creating a high heat self cleaning environment. After 15 minutes- shut down the grill. Using a grilling glove- remove aluminum foil and crumple up in a ball. Use the aluminum foil, a long handled brush or plastic paint scraper to scrub the interior of the lid, and remove the build-up.
After removing most of the build-up, clean the interior of the burner box and lid with dish-soap and flush with water.
Once clean, inspect all interior parts. If there are any signs of corrosion you can touch-up with Black BBQ paint, found in your local hardware stores paint aisle. Also, lightly spray the interior burner box with cooking spray to protect. This should only be done when all parts are removed for cleaning.
Burners
Signs of maintenance and assembly issues include; the smell of gas, yellow burner flames, low heat, uneven grilling, flash-back or Grease fires
- Remove burners
- Use a grill brush to remove surface debris.
- Clean the burner port holes using a wire or paperclip to unclog the ports. Be careful not to damage or enlarge the port holes.
- Using a flexible Venturi cleaning brush, clean the interior of the burner. Shake any loose debris out of the burner, through the gas inlet.
- Using a cotton swab, remove debris from the valve gas jets.
- Re-install the burner. Ensure that the burner is properly seated over the valve gas jet.
Flame Tamers (Heat Distribution Plates)
- Remove and clean heat distribution plates every other time you BBQ. If you are cooking for a large number of people, cleaning should occur immediately following cool down.
- Use a grill brush to brush away any buildup from your heat distribution plates.
- Clean away all remaining debris with mild soap and warm water.
- Dry thoroughly.
- Re-install.
Porcelain Cast Iron Cooking Grates
Seasoning cooking grates improves cooking performance, prevents damage and deterioration due to moisture and humidity, creates a non-stick surface for cooking, and extends the life of your cooking grates.
To season and restore your Porcelain Coated Cast Iron Cooking Grates:
- Remove cooking grates and brush away build up using a BBQ Grill brush
- Wash the cooking grates with a mild soap and water solution.
- Rinse thoroughly, and dry with paper towels, or shop towels.
- Important: Never soak or let soapy water sit on the grates for any length of time.
- Ensure grates are dried thoroughly.
- Coat entire grate, front and back, sides and each rod with vegetable shortening. DO NOT use salted fat such as margarine, butter or any non-stick cooking spray.
- Place grates in either your conventional oven or BBQ for 15-20 minutes at 275-300 °F to complete the seasoning process.
- Once completed, the cooking grates must be allowed to cool down.
By seasoning your cooking grates several times in a season, the pores are permeated with oil, which will prevent water from penetrating the grates and causing early degradation of this part.
Stainless Steel Cooking Grates
Stainless steel cooking grates are durable, provide excellent heat retention and offer trouble free maintenance.
Maintenance Tips:
- Before starting to preheat the barbecue, remove all build up from cooking grates using a barbecue grill brush.
- To create a non-stick surface, prep cooking grates with a light coating of vegetable shortening or vegetable oil prior to adding food to the grill.
NOTE
Under extreme heat, stainless steel cooking grates will become discolored with an orange/ brown colouring, at first use. This is a natural occurrence and does not in any way affect the composite, nor does it affect cooking performance.
Exterior Surfaces
ALL MATERIALS including stainless steel and black or silver painted parts can become stained, soiled and corroded by dirt, pollution, deposits from inappropriate cleaners and especially grease. To protect the appearance and integrity of the surface, routine cleaning is essential. Contaminants vary greatly in their effect on appearance, corrosivity and ease of removal. It may be necessary to identify the contaminant or experiment with various cleaners in order to resolve issues including the removal of free-iron contamination.
- Do prolong the service life of your BBQs exterior parts with frequent cleaning and maintenance
- Do test all cleaners on a small inconspicuous area to ensure that it is beneficial for surfaces
- Do use a soft and clean cloth, rag, or sponge when cleaning surfaces to avoid scratching finish
- Do use one of the following methods of cleaning:
- Warm water and Mild soap solution to remove all contaminants.
- Vinegar and water solution
- Orange glow stainless steel cleaner
- Do remove dirt and contamination immediately to avoid permanent damage to stainless steel or painted surfaces, due to rust and corrosion.
- Do thoroughly RINSE OFF ALL CLEANERS, with clean warm water and DRY COMPLETELY with a soft cloth.
- Do not use any chloride-containing detergents.
- Do not use any abrasive cleaners.
- Do not use ordinary carbon steel brushes, steel wool or scouring pads as they may leave particles embedded on the surface which can lead to rust.
- Do not use bleach or cleaners containing bleach. If accidental contact occurs wash immediately with baking soda and rinse thoroughly.
Storing Your BBQ
When storing your BBQ for the winter or long periods without use, you should do the following:
- Perform cleaning and maintenance of parts as outlined above.
- Remove igniter battery to avoid corrosion
- Remove all parts such as burners, flame tamers, and cooking grates that can deteriorate as a result of moisture damage.
- If storing the BBQ indoors: the propane cylinder MUST be removed and stored outdoors, in a well-ventilated area.
- When storing your grill in a garage, you should place a piece of cardboard underneath your grill to protect from concrete moisture damage.
- If storing the BBQ outdoors: the propane cylinder valve must be turned off. Cover the barbecue. DO NOT under any circumstances store the propane cylinder in the garage or near any heat source. Use a grill cover to help protect your grill from the direct environment (i.e. rain, snow, animal droppings, etc.). However, please keep in mind that this does not completely protect your grill from moisture.
Pellet Grill Maintenance
Inspecting your Grill Turismo™ Pellet grill’s parts and performing these key maintenance steps, will ensure safe and optimal performance of your pellet grill for years to come.
HOPPER CLEAN-OUT
- Turn controller "OFF", and unplug the power cord.
- Position a bucket under the pellet release channel.
- Unscrew the bolt and remove the channel stopper.
- Empty all pellets from inside the hopper.
- Use a Wet/Dry Vac to remove any leftover saw dust from the hopper housing and auger box.
- With the hopper empty, reassemble the channel stopper.
- When prepping for your next cook, refill the hopper with all-natural hardwood pellets.
Note: Let unit cool before continuing.
CLEANING THE COOKING GRATES
Cleaning minor buildup off your cooking grates is best done during preheat and shutdown when the barbecue grates are hot.
- At shutdown, turn the controller to MAX", with the lid closed, to burn-off accumulated grease.
- Use a long-handle grill brush to brush away any leftover residue.
- For a deeper clean, remove the cooled grates from the barbecue, and clean with warm soapy water, before towel drying and repositioning in the barbecue.
CLEANING THE BAFFLE PLATE
With the cooking grates removed, use a grill brush and scraper where needed to loosen and brush away any buildup from the baffle plate. This part will build up with grease quickly, and should be checked and cleaned after every use.
For a deeper clean, remove the baffle plate and clean with warm soapy water, before rinsing and towel drying.
CLEANING THE INTERIOR GRILL BODY, GREASE TROUGH AND GREASE BUCKET
- Remove the cooking grates and baffle plate
- Use a scraper and loosen buildup from within the grill body and the grease trough, located on the right side of the grill body.
- Take extra care to scrape and clean the inside of the trough and remove any buildup that can affect drainage into the grease bucket below.
- Remove the grease bucket and empty contents.
- Clean with soap and warm water, and dry thoroughly before repositioning.
Once all grease has been loosened, use a Wet/Dry Vac to remove remaining debris.
BURNER POT CLEANING, IGNITION CHECK AND TEMPERATURE SENSOR CLEANING
- Use a Wet/Dry Vac to remove any remaining pellets and ash buildup from within the burner pot.
- With the burner pot free of ash and pellets, wipe the tip of the igniter that is exposed within the burner pot clean.
- Locate the temperature sensor mounted on the left side of the grill body above the cooking grates. Check to make sure it is in good condition, clean and stable.
CLEANING EXTERIOR, GRILL BODY SURFACES
Once your Pellet grill has fully cooled down
- Unplug the power cord
- Use a disposable rag or cloth, and warm soapy water to wipe away any grease or buildup from exterior surfaces.
Do not use any abrasive cleaners, oven or chemical cleaners on the grill body surfaces, as this could result in permanent damage to the paint and aesthetic of the barbecue. For tough stains or buildup, use a barbecue degreaser that is safe for painted surfaces.
CLEANING THE HOPPER ASSEMBLY AND AUGER
Once a year, open up the hopper base plate and check for dust, dirt, ash, and damages. You should wipe the fan blades with a damp cloth and ensure that the controller wires are neat and secure before reassembling the hopper base plate.
STORING YOUR PELLET GRILL
To avoid the deterioration and degradation of parts, perform seasonal maintenance prior to storing your pellet grill for the season
- Perform all cleaning and maintenance steps outlined in your Safety and Care manual.
- Wrap cooking grates and baffle plate in a towel and store indoors.
- It is critical that all pellets and ash are removed from the unit before storing.
- If available, store your barbecue in a garage, or shed, and place a piece of cardboard underneath your unit to protect from concrete moisture damage.
Always use a pellet barbecue cover (085-2385) to protect your pellet barbecue.
STORING PELLETS
Make sure that the pellets are kept in a cool, dry place, away from humidity and moist conditions. Once a bag is open, place the contents in an airtight container.
Pellet Grill How-To's
HOW TO COMPLETE A FUNCTIONAL CHECK AND RESTART
IF YOU HAVE EXPERIENCED ANY OF THE FOLLOWING:
- TEMPERATURE SWINGS
- EXCESS WHITE SMOKE
- ERROR CODES: ERR, ERL & ERH
There are critical steps in priming, lighting and shut down, that may have been missed,
that are likely the cause of the issue.
The best way to correct the issue is to perform a functional check and restart.
- Turn the controller to the “OFF” position.
- Unplug the unit.
- Once cooled, remove the cooking grates and baffle plate.
- IMPORTANT: Remove all unburned pellets and ash from inside and around the burner pot. Use a Wet/Dry Vac for a thorough clean. Pellets must be cooled before using a Wet/Dry Vac.
- IMPORTANT: Remove all unburned pellets and dust from the hopper assembly to expose the opening above the auger.
- Clean the sensor probe inside the grill body with rubbing alcohol to remove any soot or debris.
With the unit completely clean and all parts exposed.
- Plug the power cord into a grounded electrical outlet.
IMPORTANT: THE PELLET LID MUST BE OPEN DURING LIGHTING.
- Turn the controller to the “SMOKE” setting.
IMPORTANT
Confirm that the sensor probe is sensing temperature correctly. The ambient temperature should appear on the controller with flashing dots.
Confirm that the combustion fan is operating. The fan will start once the controller is turned on, and will be heard throughout the shut down cycle, even when the controller is turned “OFF”.
Confirm that the auger is turning. The auger turns intermittently every 3-5 minutes. Once you see the auger turning, this will confirm that the auger and auger motor are functioning correctly.
The igniter will glow red when in operation, we will verify function in step 12.
DO NOT TOUCH THE IGNITER.
- Shut Off the controller.
IMPORTANT: With the functional check complete. Do not replace the cooking grates and baffle plate yet.
- Load dry 100% BBQ hardware pellets into the hopper assembly.
- WITH THE PELLET LID STILL OPEN, turn the controller to the “SMOKE” setting. Pellets should begin falling into the burner pot.
NOTE: If successful, the pellets will ignite and begin burning within 4-6 minutes.
- Once the pellets have lit successfully, use protective gloves to replace the baffle plate and cooking grates
- Allow the burner pot to smolder before closing the lid and setting the controller to the desired temperature.
Follow these tips to avoid issues related to temperature fluctuations and error codes in the future.
- Always have the pellet lid in the open position before turning the controller to the “SMOKE” setting.
- Always keep the pellet lid open until smoke is visible from the burner pot.
- Always light the grill with the controller set to the “SMOKE” setting.
- Always remove pellets from the hopper assembly after use to avoid pellets from clumping and tunneling.
- Always stir pellets during long cooks to avoid pellets tunneling or sticking to the sides, which will disrupt the flow of pellets into the auger.
- Always vacuum out excess pellets and ash from the burner pot every couple of cooks to avoid overfiring or issues with proper lighting.
- Always follow proper shut down procedure. Once the controller has been turned to the “OFF” position, the grill must be left plugged in until the combustion fan turns off, completing the shutdown procedure.
- Always clean the sensor probe to ensure the most accurate temperature reading.
- Always store pellets in a dry place. Do not use pellets if they are damp or clumping together as they could jam the auger.
- Always allow the controller and functioning parts to do their job. Do not try to rush the lighting process or preheat by adjusting the temperature higher. It will take much longer for the grill to stabilize.
Griddle Grilling Tips
- ALWAYS turn control knobs and gas supply "OFF" when not in use.
- Do not leave griddle unattended at any time while in operation.
- If the griddle surface and components have not been regularly maintained or safety checked, take extreme caution at first lighting, during preheat and when cooking at high temperatures.
- Never move the griddle while in operation or still hot.
- All surfaces in and around the griddle can become HOT to the touch. Keep children and pets away. Do not allow people to congregate around the griddle. Always use long-handled barbecue utensils and grilling gloves to avoid burns and protect from grease splatters.
- The grease cup must be in position before cooking.
- Always empty the grease cup after every cook. Do not remove the grease cup until it has completely cooled.
- Clean the griddle often, preferably after each cookout.
- If you notice grease dripping from the griddle, wait until cool and adjust the level of your griddle top to ensure that grease flows correctly into the grease cup.
- Perform a leak test every time you change your LP cylinder.
- Inspect your griddle's hose and regulator for any cracks, tears or damage caused by rodents. If unsure, perform a leak test to ensure your safety and the safety of others around you.
- If the regulator frosts, turn "OFF" the griddle and LP cylinder valve immediately. This indicates a problem with the cylinder and it should not be used on any product. Return to supplier!
- Never position any flammable or temperature sensitive item close to the griddle surface, as they may overheat and result in an explosion, fire, severe personal injury or death.
- Do not use water on a fire. If a fire develops and it is safe to do so, turn the LP cylinder off and disconnect it. Wait for the fire to go out before turning the control knobs "OFF".
Griddle Maintenance
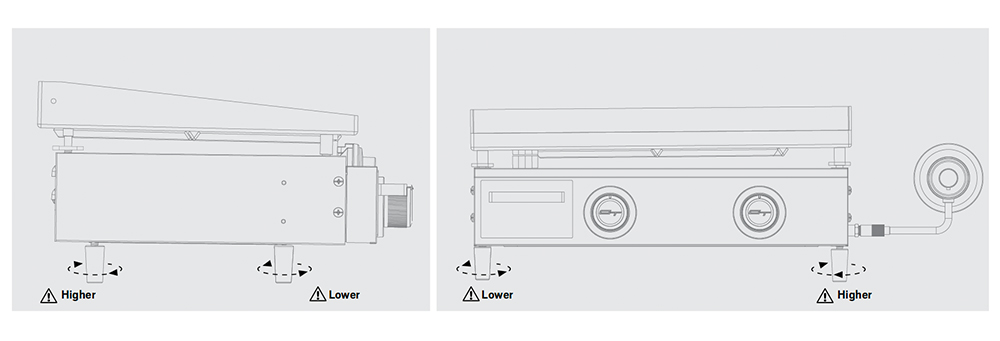
Levelling Your 22" Portable Griddle
Levelling your griddle will ensure proper flow of grease in the grease channel and into the awaiting grease cup.
Now that you have chosen a location for your griddle, you will need to adjust the levelling feet on the bottom of griddle assembly to encourage the flow of grease to the proper location.
ATTENTION
ONLY ADJUST THE LEVELING FEET WHEN YOU HAVE YOUR GRIDDLE IN POSITION AND WHEN THE GRIDDLE IS COOL.
Seasoning Your Griddle
Seasoning your griddle top improves the cooking performance, creates a non-stick surface for cooking, prevents damage and deterioration due to moisture and humidity and extends the life of your griddle.
PLEASE NOTE:
The Grill Turismo™ 22" Portable Gas Griddle is pre-treated with soy oil as a protective coating. This coating may leave a discolouration on the griddle top. This is normal and will not affect the seasoning process.
RECOMMENDED OILS FOR SEASONING
- Vegetable oil
- Vegetable shortening
- Canola oil
- Flax oil
- Olive oil – Not ideal. Burns off at lower temperature than the other options above.
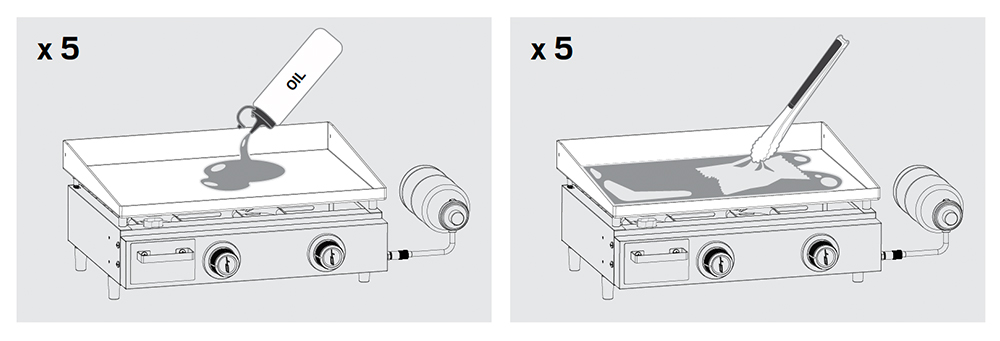
Seasoning Process:
- Light the griddle and set controls to the "05" / "Max" position.
- Apply oil to the griddle top, sides and corners, using long handle tongs and paper towels to spread the oil and coat the entire surface thoroughly.
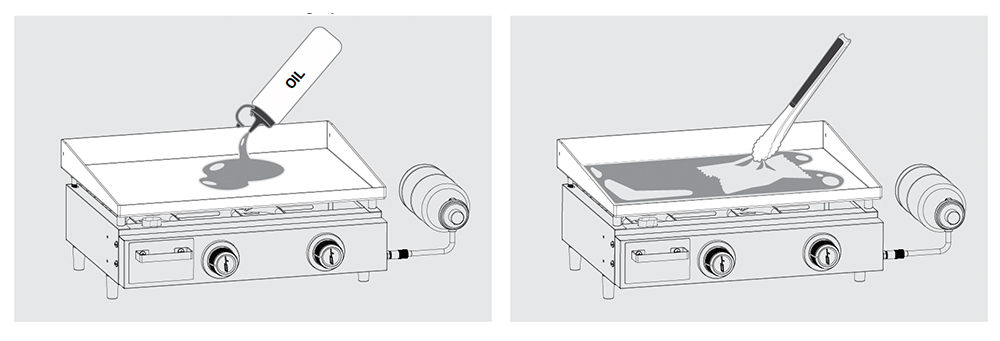
- Heat the oil to its smoke point. You will notice the griddle top changing colour.
- When the oil stops smoking, repeat steps 2 to 4, until there is a noticeable sheen on the surface. About 3-5 times, until the griddle surface becomes dark.
With continued use of your griddle, the seasoning bond will get better and better. Applying a coating of oil at the start and finish of each cook, will help to maintain seasoning. Never use soap to clean the griddle, this will destroy the seasoning. Never pour cold water on a hot griddle surface, as this can cause the griddle top surface to warp.
ATTENTION
CUSTOMERS IN HUMID OR COASTAL CLIMATES MAY REQUIRE MORE FREQUENT SEASONINGS AND THE USE OF HEAVIER COOKING OILS TO AVOID RUSTING AND CORROSION
Warping
Small variations in manufacturing and raw materials can cause some griddles to warp slightly during preheat, when applying water to the surface or placing cold food directly on the cook surface. Warping will correct itself after the first 5-10 uses.
Cleaning Your Griddle
- At the end of every cook and before storing your griddle, cool griddle below 300°F (150°C). Scrape any food debris using a spatula or straight metal scraper.
- Wipe griddle surface with paper towel
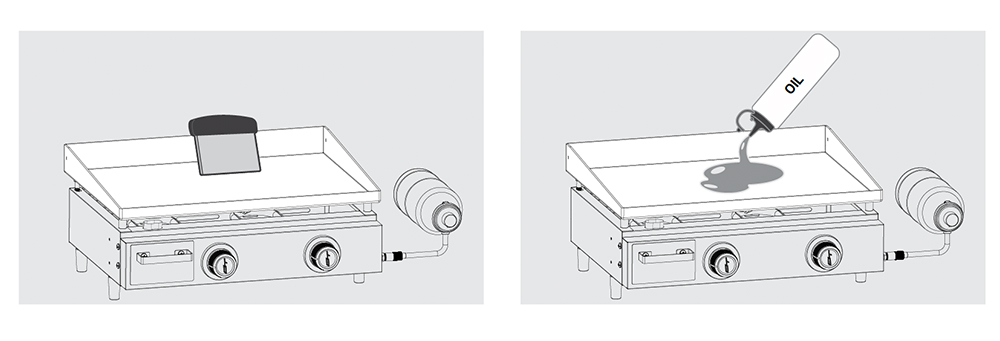
- For hard-to-remove grease, you can use a tablespoon of water and your scraper to loosen debris and scrape into the grease cup.
- Apply thin coat of cooking oil to maintain seasoning and protect the griddle top.
GRIDDLE SURFACE RUST
The appearance of rust spots on the griddle top is an indication that the protective seasoning has worn off and must be repeated.
Begin by removing the griddle top from the burner box and dampening the surface with water. With protective gloves and steel wool, scrub the areas of concern until the rust has been lifted from the surface. Rinse the surface thoroughly. Do not allow griddle to stand in water. Dry thoroughly. Follow the full seasoning steps outlined in the seasoning section.
GREASE CATCH
Remove and clean the grease cup AFTER EVERY USE to prevent possible spillage, grease fires and hot grease splatters.
When the griddle top and grease cup have FULLY COOLED, remove the grease cup and dump the contents into a disposable container and then into the trash. Alternatively, you can place the disposable container into the fridge for the oil to solidify, before throwing into the trash.
BURNERS & BURNER BOX MAINTENANCE
Although your griddle’s burner box is fully protected from grease and other build-up that can accumulate during cooking, regular checks of the burners and ignition electrode are still required to ensure proper performance, safety and longevity of your griddle.
BURNER MAINTENANCE
Because the burners are covered by the griddle top, it is not as easy to identify poor performance and premature aging of parts.
For this reason, we recommend that once a season the griddle top is removed and burner maintenance conducted:
- Remove griddle top. Place it down right side up.
- Remove the hardware to free the burners. Use WD40 and a screwdriver to make this removal easier.
- Remove burners.
- Use a flexible venturi brush to clean the interior of the burners. Ensure you enter the burner far enough to remove any spider webs and nests that may be present.
- Use a wire or paper clip to clean any blocked burner ports.
- Brush away any rust or corrosion from the burners surface, and wipe clean with a damp cloth. Dry the burners.
- Re-install the burners. Ensure that the burners are properly seated on the valve gas jet before assembling hardware.
NOTE: Before reinstalling burners, use a cotton swab to clean the valve gas jet.
Cleaning Exterior Parts and Surfaces
ALL MATERIALS including stainless steel, porcelain, and painted steel parts can become stained, soiled and corroded by dirt, pollution, deposits from inappropriate cleaners and grease. Routine cleaning of exterior surfaces is necessary to remove contaminants, rust and avoid permanent damage.
- DO remove dirt and contamination immediately to avoid permanent damage to porcelain, or painted surfaces.
- DO wipe down all surfaces frequently with a basic vinegar and water solution, or basic warm water and detergent.
- DO RINSE OFF all cleaners, with clean warm water, and dry completely with a soft or microfiber cloth.
- DO NOT use any chloride-containing detergents, abrasive cleaners, bleach or other chemical cleaners as they may permanently damage painted surfaces.
Storing Your Griddle
When storing your barbecue for the winter or long periods without use, you should do the following:
- Perform cleaning and maintenance of all parts and surfaces.
- If possible, always store in a cool, dry location.
- Remove the LP cylinder when storing your griddle. Store appliance indoors ONLY if gas supply is turned off, disconnected and removed from appliance and stored outdoors.
- If storing for long periods of time, make sure that the griddle top is fully seasoned and protected.
- Only cover the griddle when the unit is fully cooled.
- Always cover your griddle with an all-weather grill cover, to protect from all elements. It is recommended
Pizza Gas Oven Troubleshooting
Burner will not light
| POSSIBLE CAUSE: | PREVENTION / SOLUTION: |
| Low or out of propane |
|
| Regulator flow limiting device (FLD) activated due to a poor connection, improper lighting |
|
| Flame safety device (FSD) has been activated |
|
| Electrode failure |
|
| Burner not properly seated on valve assembly |
|
Sudden drop in gas flow
| POSSIBLE CAUSE: | PREVENTION / SOLUTION: |
| Low or out of propane |
|
| Regulator flow limiting device (FLD) activated due to improper lighting procedure or a gas leak |
|
Pizza oven keeps shutting down / flame blows out / difficulty lighting pizza oven
| POSSIBLE CAUSE: | PREVENTION / SOLUTION: |
| Improper lighting procedure. The control knob was not held down long enough during lighting. |
|
| Flame safety device (FSD) activated. The FSD is a part of the gas valve that ensures that the fuel supply to the pizza oven is cut off automatically and immediately if for any reason the flame goes out or becomes unstable. |
|
| Regulator flow limiting device (FLD) activated due to improper lighting procedure, a poor connection or a leak |
|
| Low or out of propane |
|
| High or gusting winds |
|
Pizza oven low heat issues
| POSSIBLE CAUSE: | PREVENTION / SOLUTION: |
| Low or out of propane |
|
| Longer preheat required |
|
| Regulator flow limiting device (FLD) activated due to improper lighting procedure, a poor connection or a leak |
|
Flare-up inside pizza oven
| POSSIBLE CAUSE: | PREVENTION / SOLUTION: |
| When pizza toppings and/or sauce fall onto the pizza stone or come in contact with the rear heat shield, a flare-up can occur |
|
| Oven temperature too hot |
|
| Excess flour on the cooking surface |
|
Flashback fire (melted control knob/ fire at control knob)
| POSSIBLE CAUSE: | PREVENTION / SOLUTION: |
| Burner venturi tube has a spider web or other blockage that is stopping the flow of gas into the burner |
|
My pizza stone is discoloured
| POSSIBLE CAUSE: | PREVENTION / SOLUTION: |
| The pizza stone will bake on and burn excess flour, sauces and toppings that fall onto the surface and become burnt, darkening the pizza stone |
|
Loud roaring sound when the oven is lit
| POSSIBLE CAUSE: | PREVENTION / SOLUTION: |
| The gas burner has not lit correctly |
|
Pizza Gas Oven Tips
TIPS FOR MAKING PIZZA DOUGH
- Your choice of flour is critical. "00" flour is what is used in Italy and will yield the best crust possible. If unavailable, you can use a mix of bread flour and semolina flour.
- Semolina flour can also be used for the pizza launching process. It does not char as easily as all-purpose flour. A small amount of semolina on your pizza peel will allow pizza to release easily from the peel without leaving a residue.
- A digital scale will come in handy to keep your recipe and your dough ball size consistent.
- When bulk fermenting you need an airtight container for best results.
- Always use active dry yeast.
- The best dough will require at least 2-3 days fermentation.
- Dough is easiest to stretch and slide off the peel at room temperature. If you are cold proofing dough, leave it for at least 3-5 hours at room temperature before beginning to stretch.
TIPS FOR BEST RESULTS
- Preheat the oven for at least 15 minutes before launching your first pizza.
- Use the temperature gauge on the side of the oven as a reference only, as it will not provide a precise readout of the pizza stone. Alternatively, an infrared digital thermometer can be used for more exact temperatures (for best results, check that the pizza stone has reached a minimum temperature of 450°F/232°C).
- While you get accustomed to the high pizza oven temperatures, use the control knob to adjust temperatures down slightly until you are comfortable.
- Pizzas will take 60 seconds or less to finish but must be turned frequently to avoid burning the crust.
TIPS FOR MAKING PIZZA DOUGH
- Always lightly flour your pizza peel with "00" flour and semolina flour before positioning your pizza dough.
- Place dough on the pizza peel and give it a light shake. Make sure it can slide back and forth like a hockey puck.
- Ensure that there are no holes in the dough as the sauce can create a "glue" effect between the dough and pizza peel.
- Do not leave your dough on the peel for a long time before cooking.
- Before adding your toppings, give your peel a shake to ensure that the dough is moving freely. If not, pick up the dough and add more flour to the peel.
- Avoid putting toppings and sauce to close to the edge. You want to avoid sauce and toppings from falling off in the oven when launching your pizza.
- Keep your toppings light. Heavy ingredients will weigh down your dough and make it harder to lift off of the peel or launch.
- Work quickly with adding toppings. The longer it takes to dress the pizza the more likely the sauce can seep through the dough and onto your peel creating problems for launching.
Pizza Gas Oven Maintenance
CARING FOR THE PIZZA STONE
- Avoid extreme temperature change to the stone.
- DO NOT place frozen foods on the stone.
- The stone is fragile and can break if bumped or dropped.
- The stone is very hot during use and stays hot for a long time after use.
- DO NOT cool the stone with water when the stone is hot.
- After cleaning the stone with water, the stone must be dried thoroughly before use.
CLEANING STEPS
EXTERIOR SURFACES
- The exterior surfaces can be wiped down with a damp cloth and dried immediately.
- The pizza oven must be cooled before wiping down the interior with a paper towel.
- The pizza oven must be cooled before cleaning the exterior surfaces.
- To remove baked-on soot or baked on food, turn the pizza stone over and preheat the pizza oven on "MAX" to burn off.
- Once completely cool, flip the pizza stone for the next use. The elevated temperatures inside the pizza oven will clean the underside of the pizza stone.
- When cooled, use a brush or scraper to clean the pizza stone.
- You can also wash the pizza stone using warm, soapy water. Always dry thoroughly before returning to the pizza oven.
- The pizza stone is NOT DISHWASHER SAFE.
INTERIOR SURFACES & EXTERIOR SURFACES
INTERIOR SURFACES
- Run the oven on "MAX" temperature for 15 minutes to burn off excess food.
- The pizza oven must be cooled before wiping down the interior with a paper towel.
EXTERIOR SURFACES
- The exterior surfaces can be wiped down with a damp cloth and dried immediately.
- The pizza oven must be cooled before cleaning the exterior surfaces.
Portable Grill Troubleshooting
Burners will not light (with igniter or match)
| PROBLEM | SOLUTIONS |
| Burners will not light (with igniter or match) |
|
Burners will not light with the igniter (no spark)
| PROBLEM | SOLUTIONS |
| Burners will not light with the igniter (no spark) |
|
Melting control knob/fire at control knob and control panel
| PROBLEM | SOLUTIONS |
| Melting control knob/fire at control knob and control panel |
|
Fire at any connection
| PROBLEM | SOLUTIONS |
| Fire at any connection |
|
Grill too hot
| PROBLEM | SOLUTIONS |
| Grill too hot |
|
Yellow smoky flames/gas odour can be smelled
| PROBLEM | SOLUTIONS |
| Yellow smoky flames/gas odour can be smelled |
|
Flame blows out on low
| PROBLEM | SOLUTIONS |
| Flame blows out on low |
|
Low Heat
| PROBLEM | SOLUTIONS |
| Low Heat |
|
Too much heat/excessive flare up
| PROBLEM | SOLUTIONS |
| Too much heat/excessive flare up |
|
Inside of lid is peeling—like paint peeling
| PROBLEM | SOLUTIONS |
| Inside of lid is peeling—like paint peeling |
|
Decreasing heat, "popping sound"
| PROBLEM | SOLUTIONS |
| Decreasing heat, "popping sound" |
|
Humming noise from regulator
| PROBLEM | SOLUTIONS |
| Humming noise from regulator |
|
Melting gas supply hose
| PROBLEM | SOLUTIONS |
| Melting gas supply hose |
|
Portable Grill Grilling Tips
- ALWAYS PREHEAT ON MAXIMUM TEMPERATURE WITH THE LID CLOSED.
- Longer preheat times may be required in cold temperatures.
- Always perform a burn-off of grease and remove and clean the grease tray to avoid attracting animals when camping.
- Always cook with the lid closed to maintain temperatures.
- Keep baking soda or a fire extinguisher handy to extinguish a fire.
- Cook similar portion sizes together so that they all cook evenly.
- Never pierce or press foods while they are cooking as this will cause a loss of moisture and flavour.
- Turn foods infrequently. Turn food only once, halfway through cooking time.
- Apply salt and sauces only after cooking to prevent drying out the meat.
- Use an instant read thermometer to check for doneness.
- Always have everything you need close at hand. Do not leave the grill unattended.
- Avoid overheating the grill by overcrowding the cook surface. Leave some space around food.
- Once cooking is complete, rest your meat to allow moisture to reabsorb, this will make your meat tender and juicy.
Portable Grill Maintenance
MAINTENANCE SCHEDULE
| MAINTENANCE SCHEDULE | ||
| Grease Tray | Clean the grease tray after every use and before transporting. | After every use and before transporting. |
| Leak Test | When you have performance issues, including: difficulty lighting, low flame, low heat, irregular flames, or if you smell gas. | When needed. |
| Every time you change or refill the LP cylinder, or regulator. | ||
| Cooking Grate and Griddle | After cooking, perform a burn off of excess grease and brush the cook surface with a grill brush or scraper. | After every use and before transporting. |
| Clean with soap and warm water. Never soak your grates or griddle. | When needed. | |
| Apply vegetable oil to season when the grate or griddle appear dry or rough to the touch or if you see rust or corrosive spots. | When needed. | |
| Burner | When irregular, unruly, yellow flames are visible, it indicates a blockage. See flash-back fires, page 24. | Immediately perform burner maintenance. |
| Melting control knobs melt. See flash-back fires, page 24. | Immediately perform burner maintenance. | |
| Brush burners with a grill brush to remove any build-up or corrosion. | Every 3 uses, when flareups occur, or at first signs of corrosion. | |
| Exterior Surfaces | Spot cleaning: clean up spills, grease splatter, dirt and debris on surfaces to avoid corrosion and deterioration. | Every use. |
| Hardware | Check and tighten all hardware before transporting. | Before transporting. |
| Storage Indoors | Store in a garage, shed or under a cover when not in use to avoid rust and deterioration. | Every use. |
CLEANING THE GREASE TRAY
- Remove the slide-out grease tray by pulling forward.
- Scrape the cooled contents of the grease tray into a trash container and wipe with a paper towel.
CAUTION: If the grease is still hot, wear a heat resistant glove to remove the grease tray and dispose of the contents in a heat resistant container. See Figure B.
- Reinstall the grease tray.
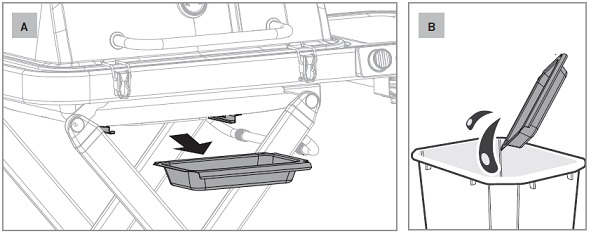
DANGER: DO NOT USE DISPOSABLE FOIL TRAYS.
DANGER: CLEAN THE GREASE TRAY AFTER EACH USE TO AVOID A GREASE FIRE.
WARNING: USE CAUTION WHEN REMOVING THE GREASE TRAY. ALLOW EXTRA TIME FOR GREASE TO COOL BEFORE TOUCHING THE GREASE TRAY.
WARNING: USE HEAT RESISTANT GRILL GLOVES WHEN OPERATING THE GRILL.
WARNING: CLEANING AND MAINTENANCE SHOULD BE CONDUCTED WHEN THE GRILL IS OFF AND THE LP GAS REGULATOR VALVE IS OFF AND DISCONNECTED.
CLEANING THE COOKING GRATE AND GRIDDLE
CLEANING THE COOKING GRATE AND GRIDDLE
- While the grill is still warm, use a grill brush to remove any build-up on the surface of the grill grate. See Figure A.
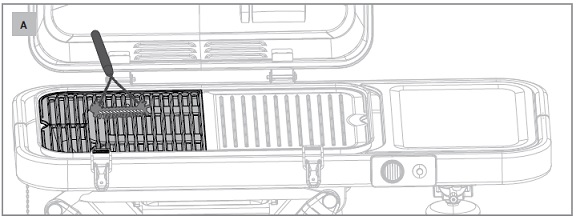
- To clean the griddle, use a scraper to collect and remove all grease and debris from the surface. See Figure B.
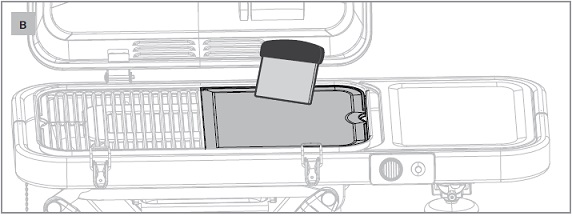
TIP: After scraping, use long-handled tongs and paper towels to remove any excess grease or build-up from the griddle surface. This will help to avoid dripping grease when moving the grill.
FOR EXCESSIVE BUILD-UP
The cooking grate and griddle are made of porcelain-enameled cast-iron and should never be submerged in water to clean. However, warm water and soap can be used with a sponge to breakdown any buildup on the cook surface. Always rinse the surface and dry thoroughly with a towel. During cleaning, always check the grates and griddle for any damage and apply vegetable oil to these areas to offer protection from rust and further damage.
CLEANING BURNER
Clean the burner surface—use a clean grill brush to remove build up, including corrosion from the surface. Do not use a grill brush used to clean the cooking surface. See Figure A.
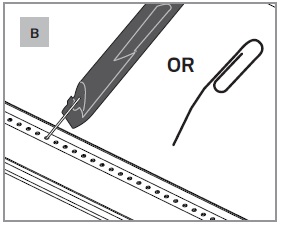
Clean the burner ports—use a wire or paper clip to remove OR blockages from the ports. Never attempt to enlarge ports. See Figure B.
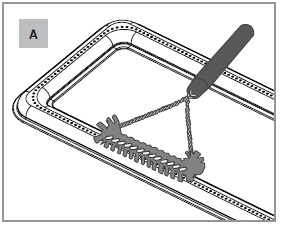
- Clean the interior of the burner—remove hardware and lift the burner to expose the burner venturi. Use a venturi brush to remove any debris from the inside of the burner. Shake out any loose debris from inside the burner. See Figure C.
DANGER: BE CAREFUL NOT TO DAMAGE OR DISCONNECT THE ELECTRODE CONNECTOR. CHECK THE ELECTRODE FOR DAMAGE OR CORROSION.

- Reinstall the burner, ensuring that the burner venturi is repositioned safely over the gas valve jet.
See Figure D and E.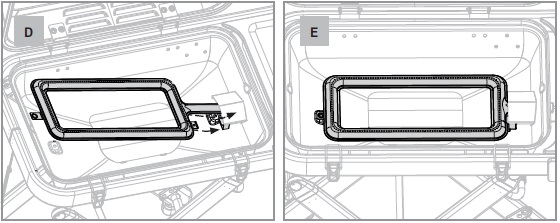
MOVING THE GRILL & STORAGE
MOVING THE GRILL
- Do not move the grill while hot.
- Clean the grease tray before moving the grill to prevent spills.
- Check all gas connections for leaks that could occur in transit.
- Ensure the lid is locked.
- Once the cart is lowered, the automatic cart lock engages to secure the cart in the folded position.
- After the cart is lowered and locked, the grill is ready to be moved.
- Move the grill slowly and avoid terrain that can cause damage to the grill or tip the grill over.
- Do not run with the grill behind you as this can cause personal injury.
- Always do a safety check of the burner after moving to make sure that the burner is still seated correctly on the gas orifice.
- Do not lift the grill by the lid handle as this could result in damage to the lid lock.
STORAGE
- Ensure all parts including the firebox and grease tray are clean before storing.
- The cooking grate and griddle must be cleaned and wrapped in a towel in a cool, dry place to avoid moisture damage causing rust and corrosion.
- Coat the burner with a light coating of oil to prevent rusting.
- If the grill is stored indoors in a shed or garage, the LP cylinder must be removed and stored outdoors.
- If storing outdoors, ensure that the grill is covered with an all-weather cover.